2 Steps to Install Ting
What's needed:
(1) a smartphone
(2) a Wi-Fi/Internet connection
(3) a few minutes of your time
NOT needed: Tools, batteries, professional installer

STEP 1 - Download the Ting Sensor App to your smartphone.
Select the app button appropriate for your smartphone: App Store or Google Play:
")
")
STEP 2 - Open the Ting Sensor app.
It will guide you through the simple installation process, including setting up your account and connecting your sensor.
Detailed Installation Steps
You'll notice buttons such as this one as you scroll through the installation procedure; clicking them will display troubleshooting help should you get stuck for some reason.
Most issues we see during installation are related to Wi-Fi or Bluetooth® connection issues, which can happen with older phones and/or older routers.
If you remain stuck for some reason, click here and let us know where you are stuck, and your phone model and operating system version.
Example:
iPhone 13, iOS v 16.1
Can't connect to my Wi-Fi.
What Ting Requires
Smartphone
running iOS or Android,
see device info
You will need to have a mobile “smartphone" (or iPad) capable of downloading and running the Ting App from the Apple App Store or Google Play Store. The Ting Sensor app is not intended for - and will not operate on - PCs, Macs, or laptops.
====
Supported Apple Devices: Devices running iOS 13 or higher. Can be installed on an iPad. Click here to view Apple's official list of devices compatible with iOS 13.
Supported Android Devices: Smartphones running Android 8 or higher. Click here for a list of supported devices, please note however that this is not an official Android site.
====
Not currently supported:
Amazon Fire Tablets
Samsung Galaxy Tablets
Microsoft Windows Phones
====
If you do not have a compatible smartphone/device, an alternative is to have a family member with a smartphone download the app and install Ting for your; please note, this cannot be done 'remotely'.
Wireless network
secure Wi-Fi is recommended,
see Wi-Fi guidance
During the installation process you’ll be asked to select a Wi-Fi network from a list of detected networks, and to authenticate to that network if it is secure (aka, encrypted; see below for a note on secure networks). This one-time process of authentication is no different from allowing a new phone, tablet, laptop, or other devices to join your network.
If you don’t see the network you plan to use:
Your network is not 2.4GHz. Ting operates on 2.4GHz networks only. Most routers have both 2.4GHz and 5GHz radios and support running both/multiple networks at the same time.
The Wi-Fi signal is weak. You might be in a 'dead zone' due to distance from your router or physical obstructions (walls & ceilings). Be sure to install Ting where you have a good Wi-Fi signal. The strength of each Wi-Fi network detected will be indicated next to the network name.
What if my network name (aka SSID) is hidden? No worries - this is a good security practice. You'll see an option to identify and use a network that has a hidden SSID. You will need to know the name of that network and will be prompted to enter the exact name.
IMPORTANT: NETWORK SECURITY
We recommend connecting to a secure network. Secure (aka encrypted) networks are the norm these days. 'Open' wireless networks are inherently unsafe. Most routers support operating multiple networks with each network separately secured (or open); Ting recommends using a WPA/WPA2 secured network.
Special note: If you are using WEP to secure your network, it will still show up, however, when you select that network we will warn you that it is not adequate. Why? WEP (Wired Equivalent Privacy) is a very old security protocol that was phased out in the early 2000’s due to extreme security flaws. If you are running WEP, it’s time to implement WPA/WPA2.
MAC Filtering - If you use this feature as part of your network security, add the MAC address for your sensor, found on the label, to your MAC filtering list before attempting to install your sensor.
You can read more here about how we’ve secured the Ting Sensor to ensure your privacy and safety.
Broadband internet
not all internet service is created equal, see Internet notes
The Ting Sensor is a smart device that requires an internet connection to communicate with the Ting service. As a 24x7 service, Ting requires a stable internet connection that is always 'on'.
If you have a steady broadband connection with your internet provider, but you 'turn off' your internet periodically, Ting will not operate.
In general satellite, dial-up, hotspots, and metro-area Wi-Fi* are not recommended.
Satellite internet is not considered to be a stable internet connection by most measures. Because of its 'path' between your home and the internet, it is prone to high 'latency'. Providers can and do 'throttle' network speeds at times. Ting will still operate, however, the Ting app may generate internet outage notifications, or you may notice gaps in data on your power quality reports.
*Public, local community, and regional Wi-Fi networks cannot be used with Ting. Aside from security concerns, these Wi-Fi network services are not reliable.
What's NOT needed: Tools, batteries, electrician, or professional installer.
Good to Know...
As you prepare to download the Ting Sensor app and follow the prompts to install, please keep the following in mind:
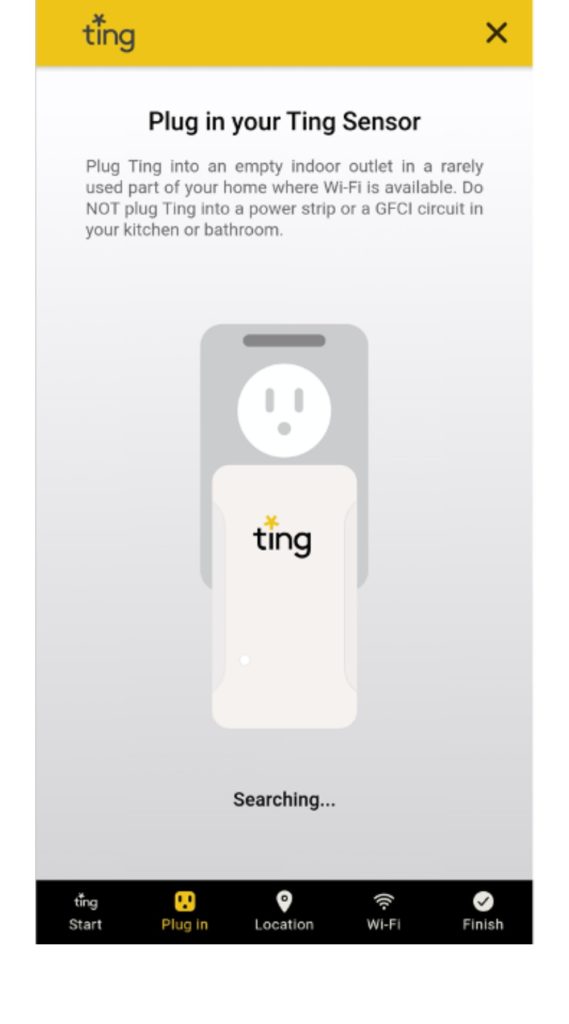
- Ting requires an indoor outlet. Learn more here about finding the best location by clicking below.
Ting is designed to work while plugged directly into a traditional 3-prong power outlet. Ideally, identify an interior outlet in a lesser-used part of your home, where your Wi-Fi signal is good.
Where NOT to locate Ting:
- Exterior outlets.
- Unconditioned spaces, for example, a traditional garage.
- Kitchen outlets.
- 'Smart plugs’ or ‘smart outlets’.
- Power strips, or uninterruptable power supplies (UPS).
- GFCI outlets. Exception: it can however be plugged into a regular outlet that happens to be on a GFCI-protected circuit.
Can I move Ting to a different outlet in my home after installing it? Yes, you can. Be sure to follow the guidelines above regarding the new location. Simply unplug it, and then plug it back in. You will receive a notification - which you can ignore - on your Ting Sensor app when you unplug/plug-in.
3-prong outlets have been the norm for decades, however, some homes just don't have them, or if they do, they are in short supply.
What if I don't have any 3-prong outlets in my home? What if the only 3-prong outlets are in the kitchen?
First, PLEASE don't break off the grounding prong on your Ting sensor (or from any plug or device). This would be a safety issue first and foremost, would void the sensor's lifetime warranty, and prevent Ting from properly operating.
Ting can be plugged in a 2 prong outlet using an adapter readily available online or at a local hardware store.
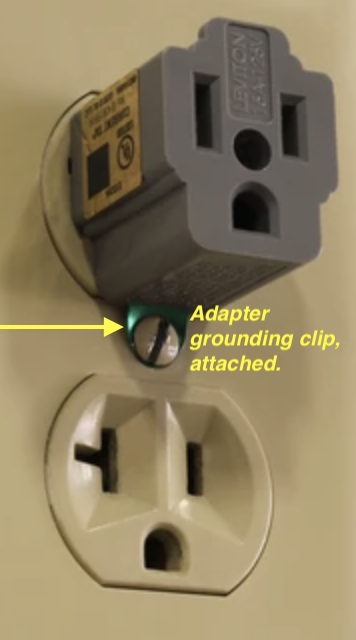
IMPORTANT: 2-3 prong adapters come with a small metal grounding clip attached to them. The clip is a square-shaped piece of metal with a circle in the middle. This grounding clip helps secure the adapter to the outlet. Install the outlet cover plate screw through the hole in the metal ground clip.
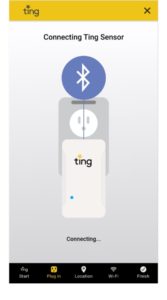
- You'll be prompted by the Ting Sensor app to turn on Bluetooth® and Location Services on your smartphone if they are not on already. Importantly - for your privacy - both of these are only needed this one time, during installation. Ting does not need - nor will Ting ever ask you to turn on - Bluetooth® or Location Services after installation.
- You'll be asked to select the home Wi-Fi network you'd like to use for Ting; as with any computer or smart home device, you'll be asked to authenticate to your network - once - if it is secure.
NOTE: We recommend following current best practices to secure your home's Wi-Fi network(s). This may include setting up a separate network for connected devices (appliances, TVs, audio equipment or speakers, thermostats, video doorbells, security systems, smoke alarms, smart switches, other sensors, etc.).
Installation Steps
Step 1 of 2 - Download and launch the Ting Sensor app
(1.a) From your smartphone, download the Ting Sensor app. To locate the Ting Sensor app:
For Apple phones: If you are viewing this from the smartphone where you will install the Ting Sensor app, click the App Store icon below. You can also open the Apple App Store on your smartphone and search for the "Ting Sensor" app - the yellow app icon.
For Android phones: If you are viewing this from the smartphone where you will install the Ting Sensor app, click the Google Play icon below. You can also open Google Play on your smartphone and search for the "Ting Sensor" app - the yellow app icon.
Do you have the right App? Make sure you've downloaded the correct app. You're looking for the Ting Sensor app, which is a yellow icon.
![]()
Avoid the blue ting app! There is a mobile phone service company that goes by the same name but is not related to our (Whisker Labs) Ting Sensor app.
===
Are you worried about your smartphone's storage (aka, memory) space? Don't be! The Ting Sensor app is relatively 'lightweight'; it does not take much space at all, generally about 15 MB, or 0.015 GB. (for comparison, many times less than browser or map apps).
===
The Ting Sensor app will never ask you for your Apple ID or Google Play credentials - or for any payment!
When you click Get/Download to load the Ting Sensor app and land on Google or Apple, you might be prompted to authenticate to your Apple ID. If you don't have your Apple ID fully set up or have not downloaded an app recently, you may also be prompted by your phone/app store to provide a payment method. This is NOT a function of Ting and is not required for the Ting Sensor app to operate.
(1.b) Launch (open) the Ting Sensor app. From this point forward, the installation process will be guided by the Ting app. We've included those steps below just in case you have questions during that process.
Stuck on the starting yellow screen when opening the app? You may have an internet connection issue on your smartphone. Close the app and restart it, and ensure that your Wi-Fi is on with a good connection.
While rarely needed, in some cases a restart of your phone may be required.
Step 2 of 2 - Follow the prompts in the app to complete the installation process
(2.a) Create your Ting Account.

You'll be presented with the 'Create Account' screen. Fill in all fields.
- Enter your first and last name
- Enter your phone number and email information - the best number(s) and email to reach you should we need to communicate with you about your service
- Create a password for your Ting app.
A minimum of 6 characters is required; if you are on a screen that does not look like this one, asking for 10 characters, you've downloaded the wrong ting app. - After completing all fields, confirm they are correct (especially your email) and click the 'Create Account' button.
Next, you'll be presented with the Terms and Conditions for your Ting Service. In parallel, we'll be emailing you a confirmation code which you'll need in Step 2.c. below.
Make sure you're on the Create Account screen. The 'Sign In' at the top right is for existing customers who have installed Ting already.
(2.b) Review Terms and Conditions.
You'll be presented with Terms and Conditions for the Ting Service, including an end-user license agreement (EULA). These terms include important information about the Ting Service. Your use of the Ting Service means you agree to these terms. Once you review and click 'I Agree' you will be taken to the next screen, where we'll ask for the confirmation code referenced above.
Note: Easy access to this agreement is always available in the app main menu (once installed), and online here.
(2.c) Confirm your email.

At the end of Step (2.a) above, Ting generated a confirmation code and sent it to the email you used to create your account. This is required to complete the account creation process and verify your email.
If you don't see the code in your email, please check your spam or junk folder. It normally only takes a minute to reach your email, however, is some cases it but could be delayed a few minutes.
- Enter the email address you used to create your account in Step (1.a) above.
- Enter or paste your confirmation code.
- Click 'Confirm Account'.
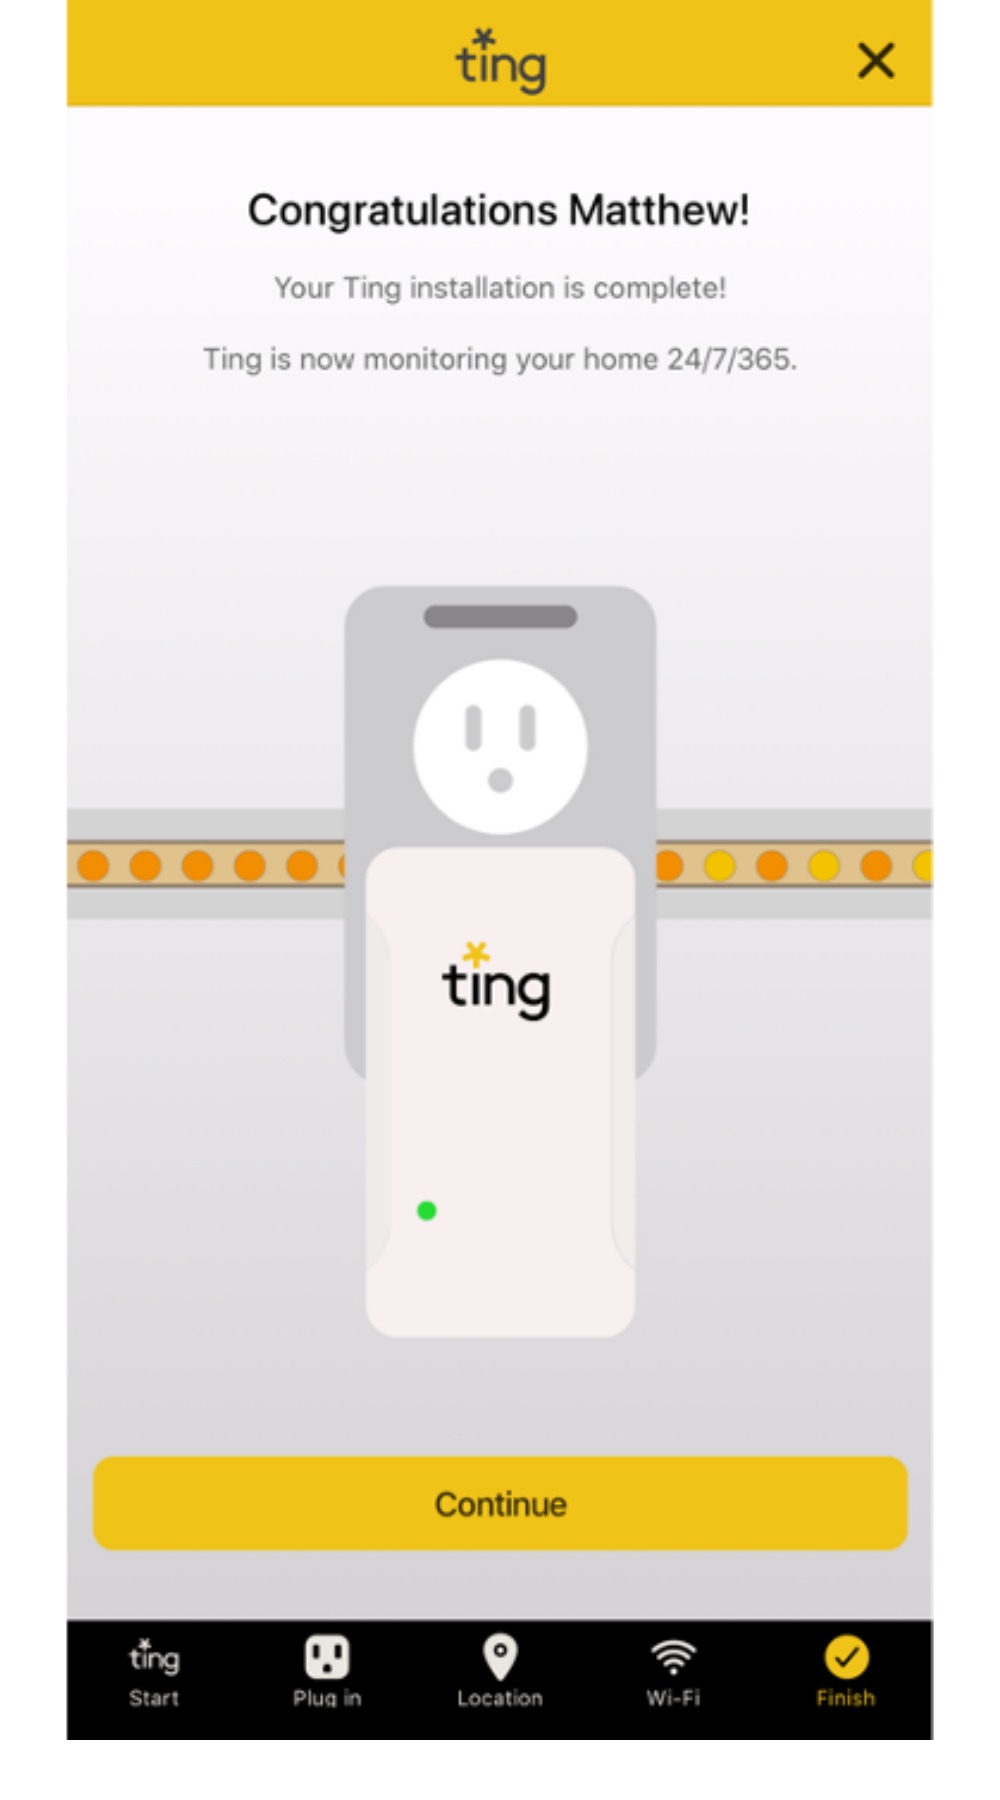
After confirming your account, the app will start the Sensor installation process.
Not receiving the confirmation code? In some cases, the confirmation code may erroneously be flagged as spam or junk. Please check those folders in your email account.
Also, be sure to check the email that was used in Step (2.a) to create your Ting account. Many of us have several email accounts, each of which is used for different purposes.
====
Received the code, but it does not seem to be working? It may be that the code expired. Please click RESEND at the bottom of your screen.
Or, the code may be valid, but your email might be incorrect. Be sure to use the email that was used in Step (2.a) to create your Ting account. Many of us have several email accounts, each of which is used for different purposes.
(2.d) Install your Ting Sensor.
If you don't have Bluetooth® and Location Services enabled on your smartphone, you'll be prompted and guided by the app to enable them for installation.
If you're having trouble with either of these smartphone functions, refer to the links below.
Learn more here about Bluetooth® settings.
Learn more here about Location Services settings.
====
A word on Location Services - Good Practice: When you're finished installing, turn off Location Services for Ting. The Ting Sensor app does not need your location after installation and does NOT engage in location tracking; be assured of that. Removing location services from any app where those services are not absolutely needed is recommended.
Will turning OFF Bluetooth® on my smartphone after installation impact Ting? No! Ting does not require Bluetooth® to remain on after installation.
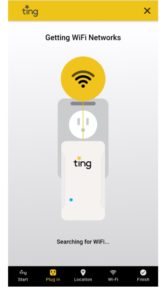
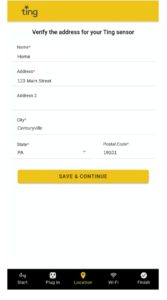
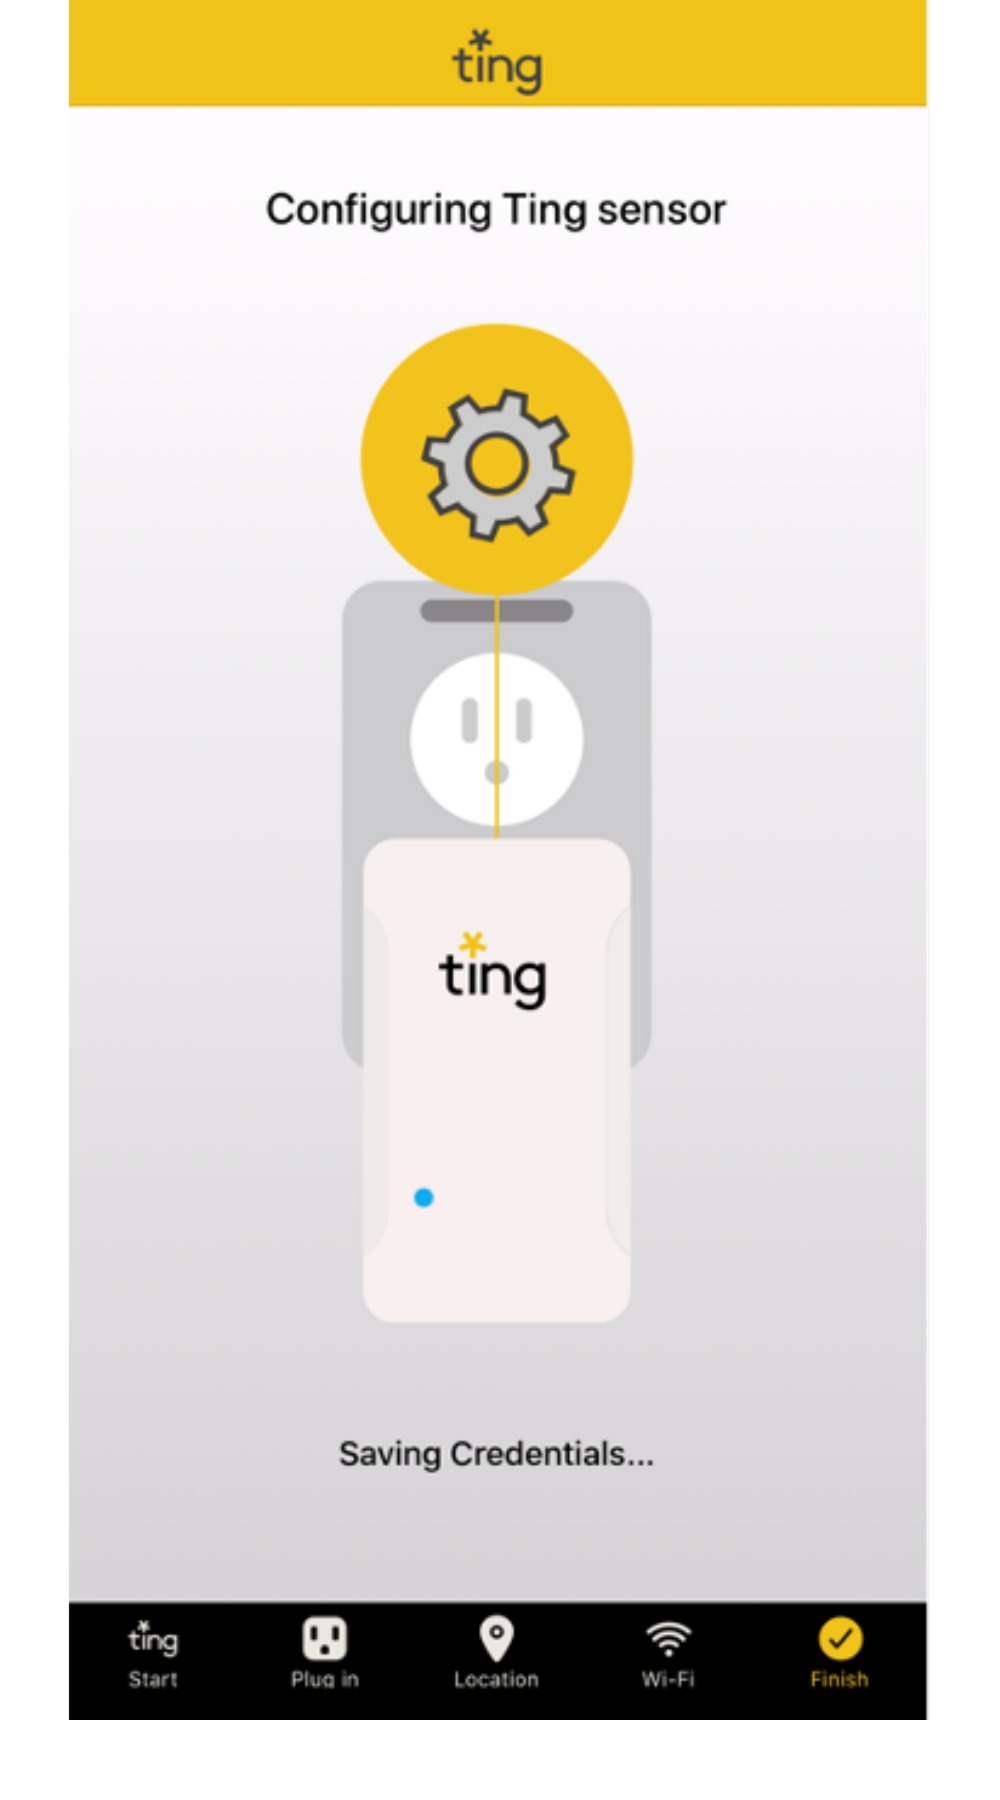
App Screens During Installation
For reference, the slider below runs through the remaining screens you'll see during this stage of the installation process.
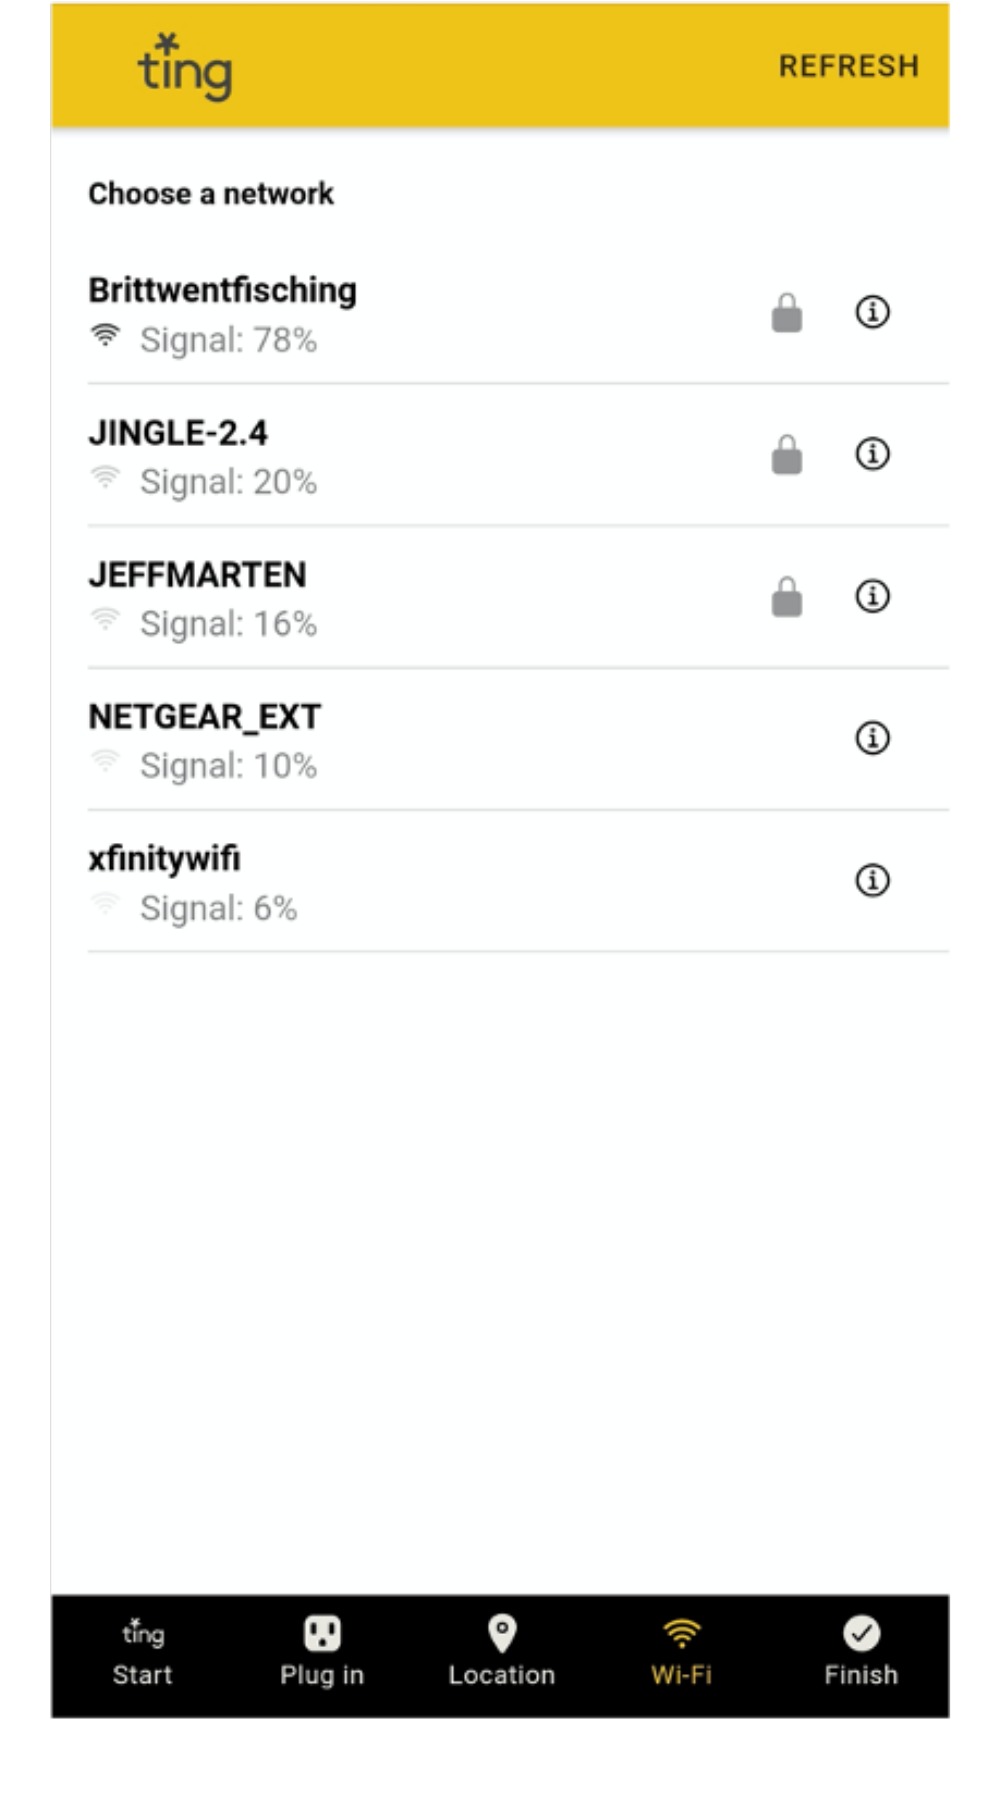

Received "WiFi password error"?
- Double-check to ensure you are connecting to the correct network, with the correct password
- If you have a 'secondary' or more than one access point in your network, restart the app.
- On some Android phones, special characters can add a space to the password, which results in the wrong password being entered. Make sure you delete any such spaces.
- If you happen to use MAC filtering as part of your network security, be sure to add the MAC address of your sensor (printed on the sensor's label) to your filter before attempting to install.
====
Received an error “Can’t Get List of Wi-Fi Networks”?
- Ensure that your smartphone sees the network you're connecting to.
- Move the sensor to an outlet that is closer to your router (if not already close).
- Otherwise, please restart your phone.
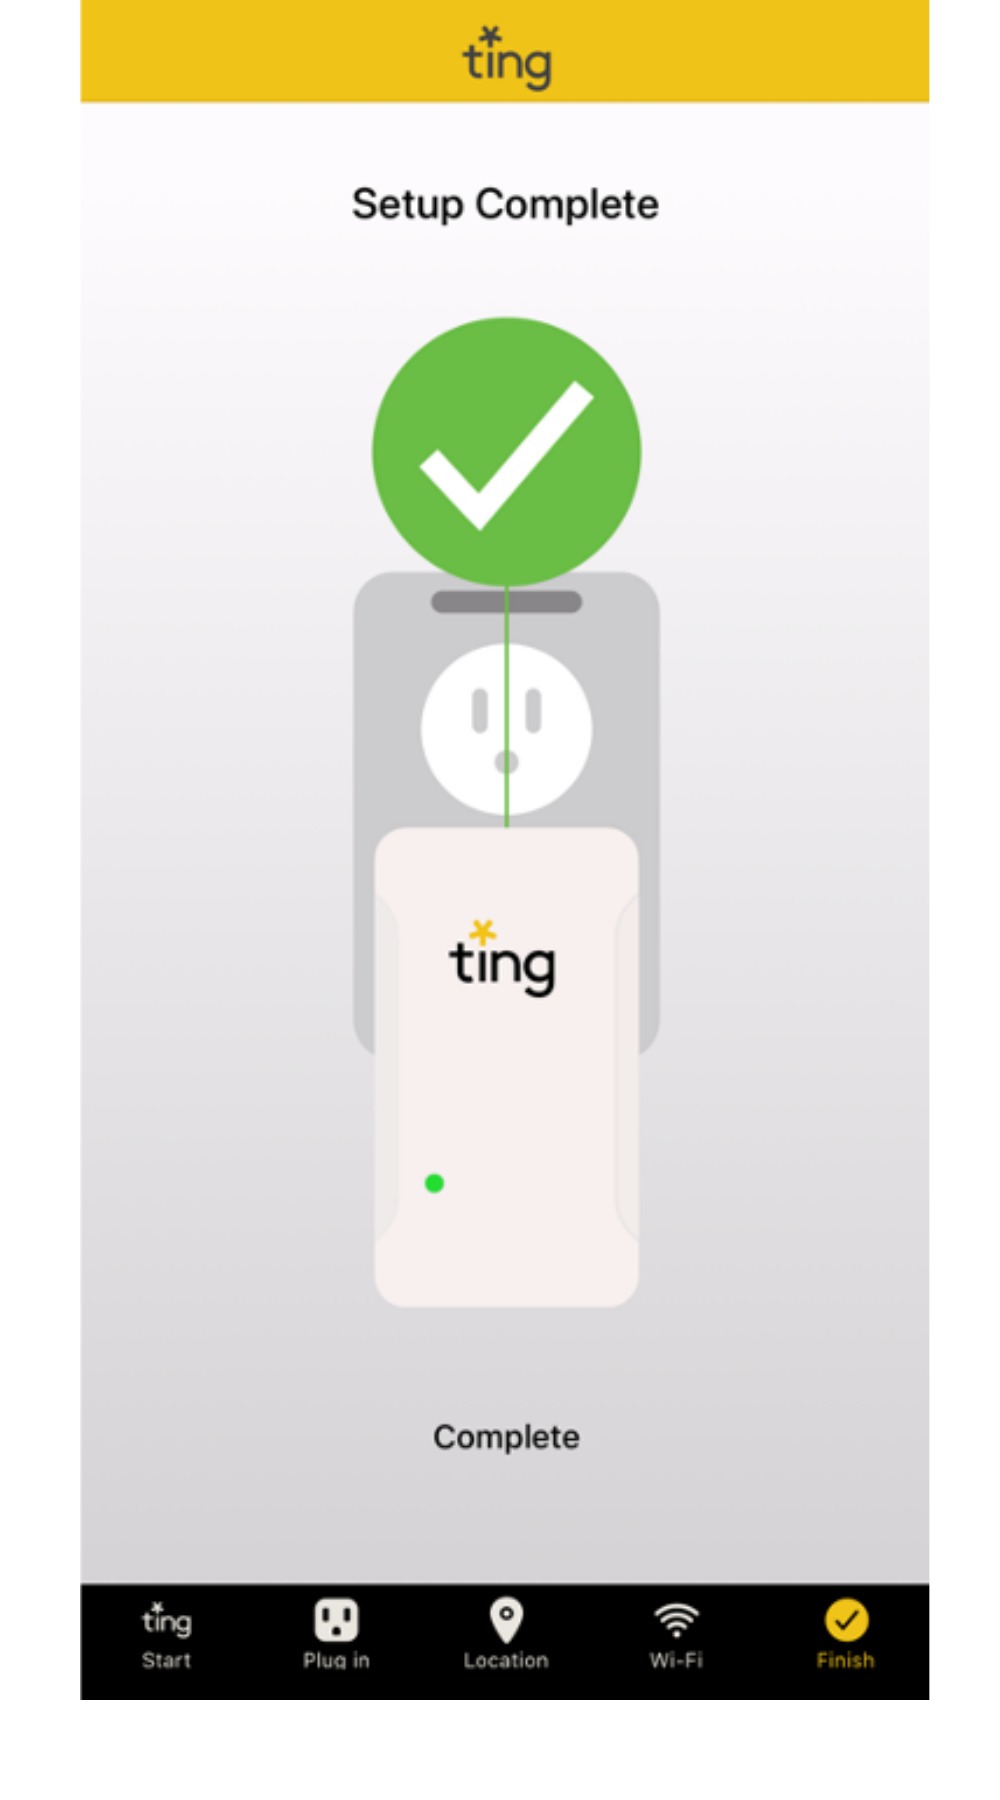
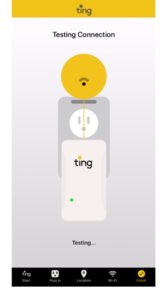
If at the end of the installation you see that your sensor is not solid green, take notice of what the sensor LED light is doing.
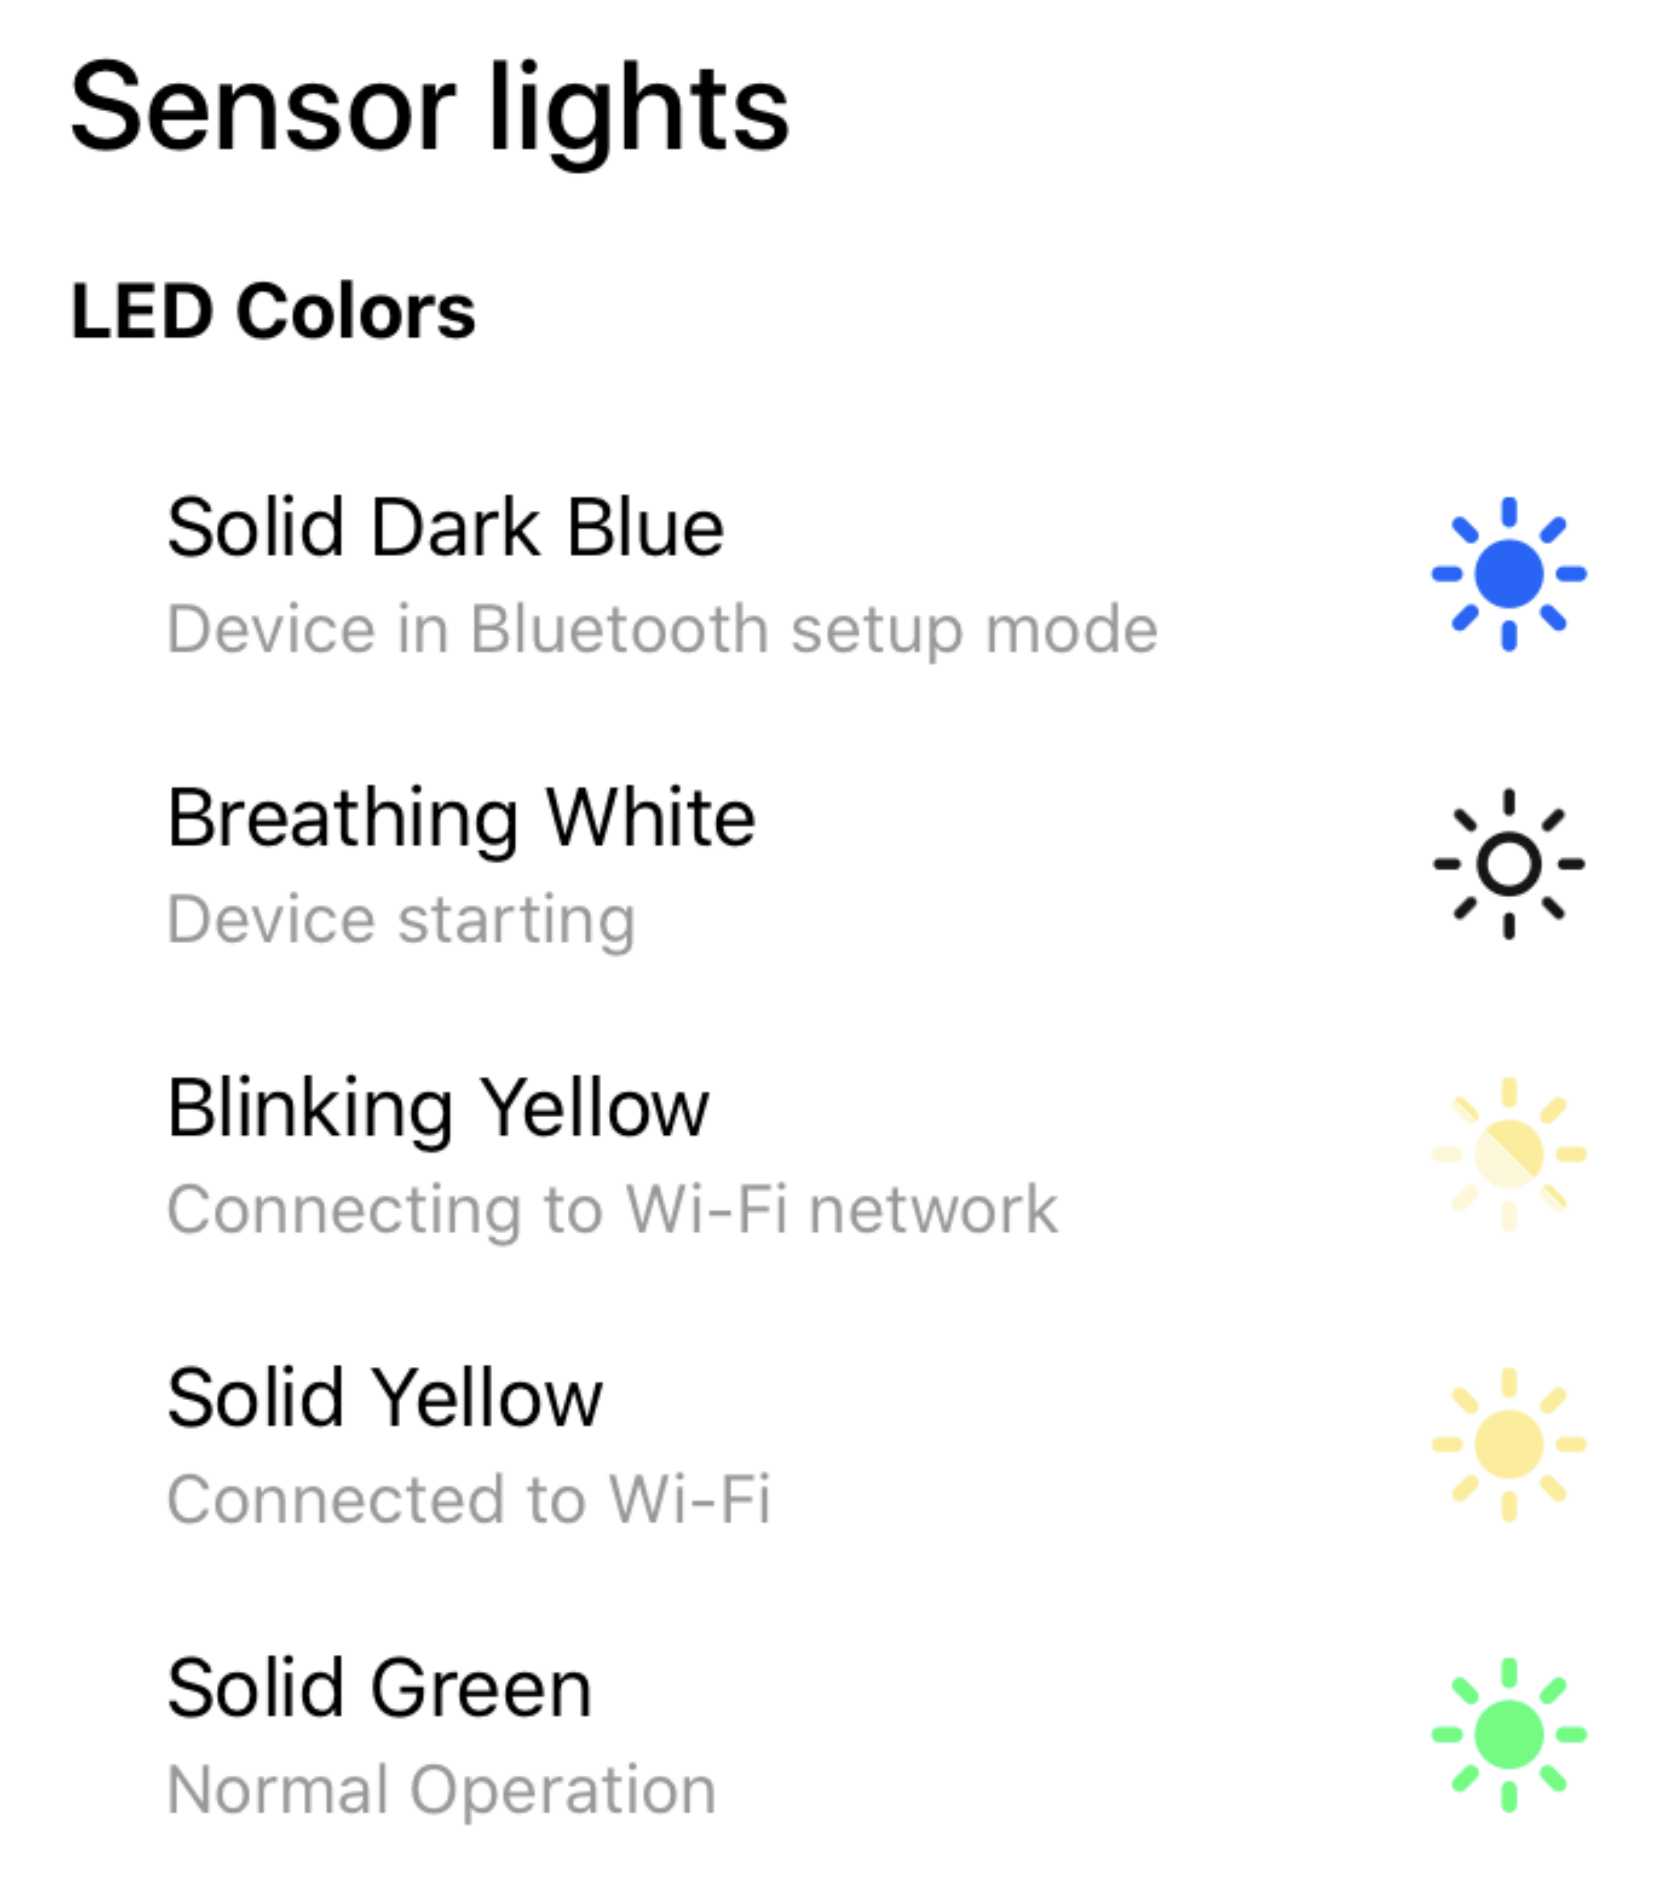
====
Firmware updates. Generally speaking, firmware is specialized 'software' that is embedded in hardware. Conveniently, we take care of ensuring your sensor firmware is always up to date with the latest security and service features.
From time to time, we will update your sensor firmware; you will see the sensor light blinking blue/red during this process. This should take no more than a few minutes to finish; your Ting sensor light should return to solid Green afterward.
Common installation issues
Click on a topic below. It will scroll you on this page to a red button with a "?" mark; clicking the button will open a sidebar information panel with additional guidance.
Not seeing what you need here? Click here to fill out our brief help form and let us know how our care team can assist. Please include your phone type, operating system, and issue.
Example: iPhone 13, iOS v 16.1. Can't connect to my Wi-Fi.
.